Using Floor Database in Flutter 2025


Introduction
In 2025, local databases are more relevant than ever. With users demanding privacy-first solutions and apps needing to handle complex data on-device, tools like Floor empower developers to build fast, secure, and offline-capable Flutter apps.
Struggling with SQLite’s complexity in your Flutter app? In 2025, as Flutter continues to dominate cross-platform development, efficient local storage is more critical than ever—especially for offline-first apps. Meet Floor: a lightweight ORM that simplifies SQLite with annotations and real-time streams. In this complete guide, you’ll master integrating Floor into your Flutter app, from setup to advanced CRUD operations, all tailored to modern standards.

Get the Mobile Testing Playbook Used by 800+ QA Teams
Discover 50+ battle-tested strategies to catch critical bugs before production and ship 5-star apps faster.
In This Tutorial, We’ll Cover:
Setting up Floor and its dependencies
Creating a database entity class
Defining a DAO for database operations
Setting up the database class
Generating the necessary code
Building a reactive UI that updates in real-time
Why Choose Floor in 2025?
Floor shines for Flutter developers because:
SQLite Made Simple: Replaces raw SQL with clean, annotation-driven code.
Auto Migrations: Effortlessly updates your database schema as your app evolves.
Reactive Streams: Powers real-time UIs with Dart’s
StreamAPI.Lightweight: Less bloated than Drift, perfect for lean apps.
Dart 3 Compatible: Fully embraces null safety and modern Dart features.
Why Mobile Data Persistence Matters in 2025
Local data persistence remains fundamental for modern Flutter applications:
Offline-First Experience: As mobile users increasingly expect seamless experiences regardless of connectivity, Floor enables your app to function perfectly even when networks fail.
Performance Optimization: Reduces API calls through local caching, making apps load faster.
Personalization Storage: Securely stores user preferences and settings.
Data Security: Leverages SQLite's robust security capabilities to protect sensitive user information.
Scalable Architecture: Ensures structured data management as apps grow.
Building a Local Database in Flutter with Floor: A Hands-On Guide
Have you ever needed to store data locally in your Flutter app? Whether you're building an app that needs to work offline or simply want to cache data to improve performance, a local database is often the answer. In this guide, we'll explore how to implement local data persistence in Flutter using the Floor library.
Use Case
Let's get our hands dirty with some code and implement local data persistence in our Flutter app using the Floor library. We'll create a simple student management app that locally stores student data. This is perfect for anyone looking to understand how database operations work in Flutter without the complexity of server communication.
1. Setting Up Dependencies
First things first, we need to add the necessary packages to our project. Add the runtime dependency floor as well as the generator floor_generator to your pubspec.yaml. The third dependency is build_runner which has to be included as a dev dependency just like the generator.
floor holds all the code you are going to use in your application.
floor_generator includes the code for generating the database classes.
build_runner enables a concrete way of generating source code files.
This is how your pubspec.yaml should look like:
dependencies:flutter:sdk: flutterfloor: ^1.5.0 # Check pub.dev for latest in 2025sqflite: ^2.4.0 # Check pub.dev for latestdev_dependencies:flutter_test:sdk: flutterfloor_generator: ^1.5.0 # Match floor versionbuild_runner: ^2.4.8 # Check pub.dev for latest
After updating your pubspec, run this command to install the dependencies:
flutter pub get
Pro Tip: Ensure your Flutter SDK is 3.19 or later for the best compatibility.
2. Creating an Entity
Now that we have our dependencies set up, let's create our first database entity. In database terms, an entity is basically a table in your database. In Flutter, it's a class that represents that table.
import 'package:floor/floor.dart';@entityclass Student {@primaryKeyfinal int? id; // Nullable for auto-increment@ColumnInfo(name: 'name')final String name;@ColumnInfo(name: 'age')final int age;const Student({this.id, required this.name, required this.age});}
Let's break down what's happening here:
We use the
@entityannotation to tell Floor that this class represents a database table.The
@primaryKeyannotation marks the id field as the primary key of our table. Making it nullable (int?) allows the database to auto-generate IDs for new entries.Each
@ColumnInfoannotation explicitly names a column in our database table, making it easier to work with and debug later.We're using an immutable class with final fields to prevent accidental data modification, which is a good practice for database entities.
This modern approach takes advantage of Dart's null safety and named parameters to create a clean, intuitive API for working with student data.
3. Creating the DAO (Data Access Object)
Next, we need a way to access and manipulate data in our database. This is where the DAO (Data Access Object) comes in. The DAO is an interface that defines methods for database operations like creating, reading, updating, and deleting records.
import 'package:floor/floor.dart';import 'student.dart';@daoabstract class StudentDao {@Query('SELECT * FROM Student')Future<List<Student>> getAllStudents();@Query('SELECT * FROM Student')Stream<List<Student>> streamAllStudents(); // Real-time updates@Insert(onConflict: OnConflictStrategy.ignore)Future<void> insertStudent(Student student);@Query('DELETE FROM Student WHERE id = :id')Future<void> deleteStudentById(int id);}
This might look a bit magical if you're new to Floor, so let me explain what's happening:
The
@daoannotation tells Floor that this abstract class is a Data Access Object.We define methods for the operations we want to perform on our Student table.
The
@Queryannotation allows us to write custom SQL queries.Notice we have two methods to get all students - one returns a Future and one returns a Stream. The Stream version is super powerful because it will continuously emit new values whenever the database changes!
The
@Insertannotation automatically creates a method to add new students to the database.We use
OnConflictStrategy.ignoreto prevent duplicate entries.
The beauty of Floor is that you don't have to implement any of these methods yourself. Floor's code generator will create all the necessary implementations based on these annotations!
4. Creating the Database
Now that we have our entity and DAO, we need to tie everything together with a database class:
import 'dart:async';import 'package:floor/floor.dart';import 'package:sqflite/sqflite.dart' as sqflite;import 'student.dart';import 'student_dao.dart';part 'app_database.g.dart'; // Generated file@Database(version: 1, entities: [Student])abstract class AppDatabase extends FloorDatabase {StudentDao get studentDao;static Future<AppDatabase> init() async {return await $FloorAppDatabase.databaseBuilder('app_database.db').build();}}
Here's what this code does:
The
@Databaseannotation specifies that this class represents our SQLite database.We set the version to 1 (you'll increment this when making schema changes in future updates).
We list all our entity classes in the
entitiesarray (justStudentfor now).We include a
partdirective that connects to the generated code file.We define a getter for our
StudentDao, which Floor will implement for us.The static
init()method provides a convenient way to initialize the database throughout our app.
This abstraction layer keeps our code clean and makes it easy to add more entities and DAOs as our app grows.
5. Running the Code Generator
Before we can use our database, we need to generate the implementation code:
flutter pub run build_runner build
This command tells Floor's code generator to create all the necessary implementation classes based on our annotations. It will create an app_database.g.dart file with all the boilerplate SQLite code that you'd otherwise have to write manually.
If you're actively developing your app, you might prefer to use:
flutter pub run build_runner watch
This command watches for changes in your files and automatically regenerates the code when needed.
6. Creating the App
Now for the fun part - let's build our app using the database we've set up! We'll create a simple but functional app that demonstrates Floor's capabilities.
Setting Up the App Structure
First, let's set up the basic structure of our app:
void main() => runApp(const MyApp());class MyApp extends StatelessWidget {const MyApp({super.key});@overrideWidget build(BuildContext context) {return const MaterialApp(title: 'Student Database Demo',home: HomeScreen(),);}}
Creating the HomeScreen
Next, let's create our HomeScreen that will display the list of students:
class HomeScreen extends StatefulWidget {const HomeScreen({super.key});@override_HomeScreenState createState() => _HomeScreenState();}class _HomeScreenState extends State<HomeScreen> {late Future<AppDatabase> _dbFuture;@overridevoid initState() {super.initState();_dbFuture = AppDatabase.init(); // Initialize database when screen loads}
Building the UI with Real-Time Updates
Now for the exciting part - building a UI that automatically updates when our database changes:
@overrideWidget build(BuildContext context) {return Scaffold(appBar: AppBar(title: const Text('Student Database')),// StreamBuilder connects to database streambody: StreamBuilder<List<Student>>(stream: _dbFuture.then((db) => db.studentDao.streamAllStudents()),builder: (context, snapshot) {if (snapshot.connectionState == ConnectionState.waiting && !snapshot.hasData) {return const Center(child: CircularProgressIndicator());} else if (snapshot.hasError) {return Center(child: Text('Error: \${snapshot.error}'));} else if (!snapshot.hasData || snapshot.data!.isEmpty) {return const Center(child: Text('No students yet! Tap the + button to add one.',textAlign: TextAlign.center,),);}// Display the list of studentsfinal students = snapshot.data!;return ListView.separated(itemCount: students.length,separatorBuilder: (context, index) => const Divider(height: 1),itemBuilder: (context, index) {final student = students[index];return ListTile(leading: CircleAvatar(child: Text('\${index + 1}'),),title: Text(student.name),subtitle: Text('Age: \${student.age}'),trailing: IconButton(icon: const Icon(Icons.delete),onPressed: () async {// Delete the student when the button is pressedfinal db = await _dbFuture;await db.studentDao.deleteStudentById(student.id!);// No setState needed! StreamBuilder updates automaticallyScaffoldMessenger.of(context).showSnackBar(SnackBar(content: Text('\${student.name} deleted')),);},),);},);},),
Adding a Floating Action Button for New Students
floatingActionButton: FloatingActionButton(onPressed: () => _showAddDialog(),tooltip: 'Add Student',child: const Icon(Icons.add),),);}
Adding a Dialog to Insert a New Student
To allow users to add a new student, we implement a dialog box:
// Show a dialog to add a new studentvoid _showAddDialog() {final nameController = TextEditingController();final ageController = TextEditingController();showDialog(context: context,builder: (ctx) => AlertDialog(title: const Text('Add New Student'),content: Column(mainAxisSize: MainAxisSize.min,children: [TextField(controller: nameController,decoration: const InputDecoration(labelText: 'Name',hintText: 'Enter student name',),textCapitalization: TextCapitalization.words,autofocus: true,),const SizedBox(height: 16),TextField(controller: ageController,decoration: const InputDecoration(labelText: 'Age',hintText: 'Enter student age',),keyboardType: TextInputType.number,),],),actions: [TextButton(onPressed: () => Navigator.pop(context),child: const Text('Cancel'),),TextButton(onPressed: () async {// Validate inputif (nameController.text.isEmpty || ageController.text.isEmpty) {ScaffoldMessenger.of(context).showSnackBar(const SnackBar(content: Text('Please fill all fields')),);return;}int? age = int.tryParse(ageController.text);if (age == null || age <= 0) {ScaffoldMessenger.of(context).showSnackBar(const SnackBar(content: Text('Please enter a valid age')),);return;}// Save the student to the databasefinal db = await _dbFuture;await db.studentDao.insertStudent(Student(id: null, // Let the database assign an IDname: nameController.text.trim(),age: age,),);if (mounted) {Navigator.pop(context);// UI updates automatically thanks to StreamBuilder!}},child: const Text('Save'),),],),);}
This dialog ensures user input validation and automatically updates the UI using StreamBuilder.
We've built a fully functional app with local database capabilities using Floor.
Key Features of This Implementation:
Real-time updates: The StreamBuilder approach creates a reactive UI that updates immediately when data changes.
Minimal code: No need to manually refresh the screen or call
setStateafter database operations.Single-screen CRUD: All Create, Read, Update, Delete operations are handled in one place.
Clean architecture: The separation of entities, DAOs, and database class creates a maintainable structure.
Type safety: Floor ensures type safety between Dart code and SQLite.
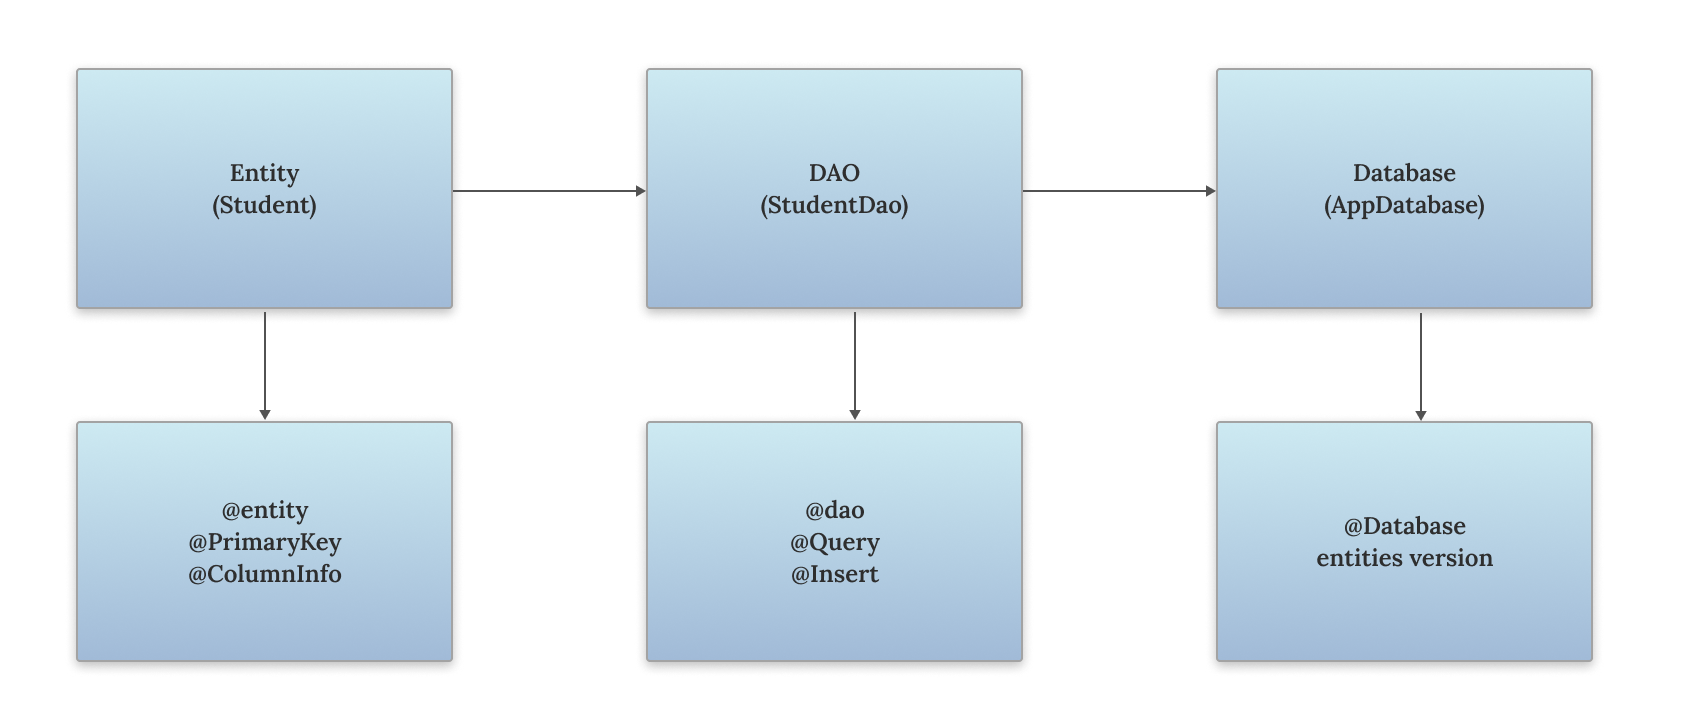
Floor Architecture: How It Works
Optimizing Floor in 2025
Boost performance with these modern practices:
1. Embrace Streams for Real-Time UI Updates
Using Streams ensures your UI automatically updates when data changes:
@Query('SELECT * FROM Student')Stream<List<Student>> streamAllStudents();
2. Optimize Queries to Fetch Only What You Need
Fetching minimal data improves efficiency and performance:
@Query('SELECT name FROM Student WHERE id = :id')Future<String?> getStudentName(int id);
3. Enable WAL Mode for Better Concurrency
Write-Ahead Logging (WAL) mode enhances database performance and allows multiple reads and writes concurrently:
final db = await $FloorAppDatabase.databaseBuilder('app_database.db').addCallback(Callback(onOpen: (db) async => await db.execute('PRAGMA journal_mode=WAL;'),)).build();
4. Handle Conflicts to Prevent Duplicates
Using OnConflictStrategy.ignore ensures duplicate entries are ignored gracefully:
@Insert(onConflict: OnConflictStrategy.ignore)Future<void> insertStudent(Student student);
5. Support Migrations to Upgrade Your Schema
Handling schema migrations prevents data loss when updating your app:
@Database(version: 2, entities: [Student])abstract class AppDatabase extends FloorDatabase {StudentDao get studentDao;}final migration1to2 = Migration(1, 2, (db) async {await db.execute('ALTER TABLE Student ADD COLUMN grade TEXT');});final db = await $FloorAppDatabase.databaseBuilder('app_database.db').addMigrations([migration1to2]).build();
Floor vs. Other Local Databases
Feature | Floor | Hive | Drift | ObjectBox | Isar |
SQL-Based | Yes | No | Yes | No | No |
NoSQL | No | Yes | No | Yes | Yes |
Streams | Yes | Yes | Yes | Yes | Yes |
Auto Migrations | Yes | No | Yes | Yes | Yes |
Performance | Medium | Fast | High | Very High | Very High |
Key Takeaway: Floor excels for SQL simplicity; Isar and ObjectBox dominate NoSQL speed.
Migrating from Classic to Modern Floor
If you're using the approach from the original implementation, here's how to upgrade:
1. Add Stream Support
Update your DAO to include stream methods for real-time updates:
@Query('SELECT * FROM students')Stream<List<Student>> watchAllStudents();
2. Update Entity Classes
Embrace null safety and required parameters:
class Student {final int? id;final String name;final int age;Student({this.id, required this.name, required this.age});}
3. Switch from FutureBuilder to StreamBuilder
Using StreamBuilder ensures real-time UI updates when the database changes.
4. Implement Factory Methods
Create static methods for database initialization to simplify setup.
How It Works: Understanding the Demo
Here's a breakdown of the mini-app we built:
Insert: Adds a student via the Floating Action Button (FAB), auto-incrementing the ID.
Fetch: Streams all students in real-time with StreamBuilder.
Delete: Removes a student by ID, instantly updating the UI.
📌 Visual Representation: Picture a list where “Alex, Age: 23” pops up when you tap the FAB and vanishes when you hit delete.
Conclusion
In 2025, Floor makes working with SQLite in Flutter easier by handling database creation, queries, and updates with simple annotations. It's a great choice for apps that require structured data storage with minimal setup.
The key benefits that make Floor stand out:
Type-safe queries that catch errors at compile time
Null-safe operations compatible with modern Dart
SQL-centric approach for developers familiar with relational databases
Lightweight footprint compared to alternatives
Reactive architecture for responsive UIs
If you need more advanced database features, consider alternatives like Drift or ObjectBox. However, for most Flutter apps, Floor provides a good balance between simplicity and functionality.
As your app grows, you can easily add more entities and DAOs, implement relations between tables, handle migrations for schema changes, and more. Floor provides a solid foundation that scales with your app's complexity.
Ready to integrate Floor into your Flutter app? Start coding today!
What database features are you planning to add to your Flutter app? Let me know in the comments!
Continue reading
More articles from the Quash editorial desk.


