> ## Documentation Index
> Fetch the complete documentation index at: https://quashbugs.com/docs/llms.txt
> Use this file to discover all available pages before exploring further.
# Creating a Suite
> Create a suite end to end: add library or on-the-spot cases, optional groups, pick Sequential or Isolated, run, then extend or retire it.
## Step 1 — Create the suite
## SCREENSHOT
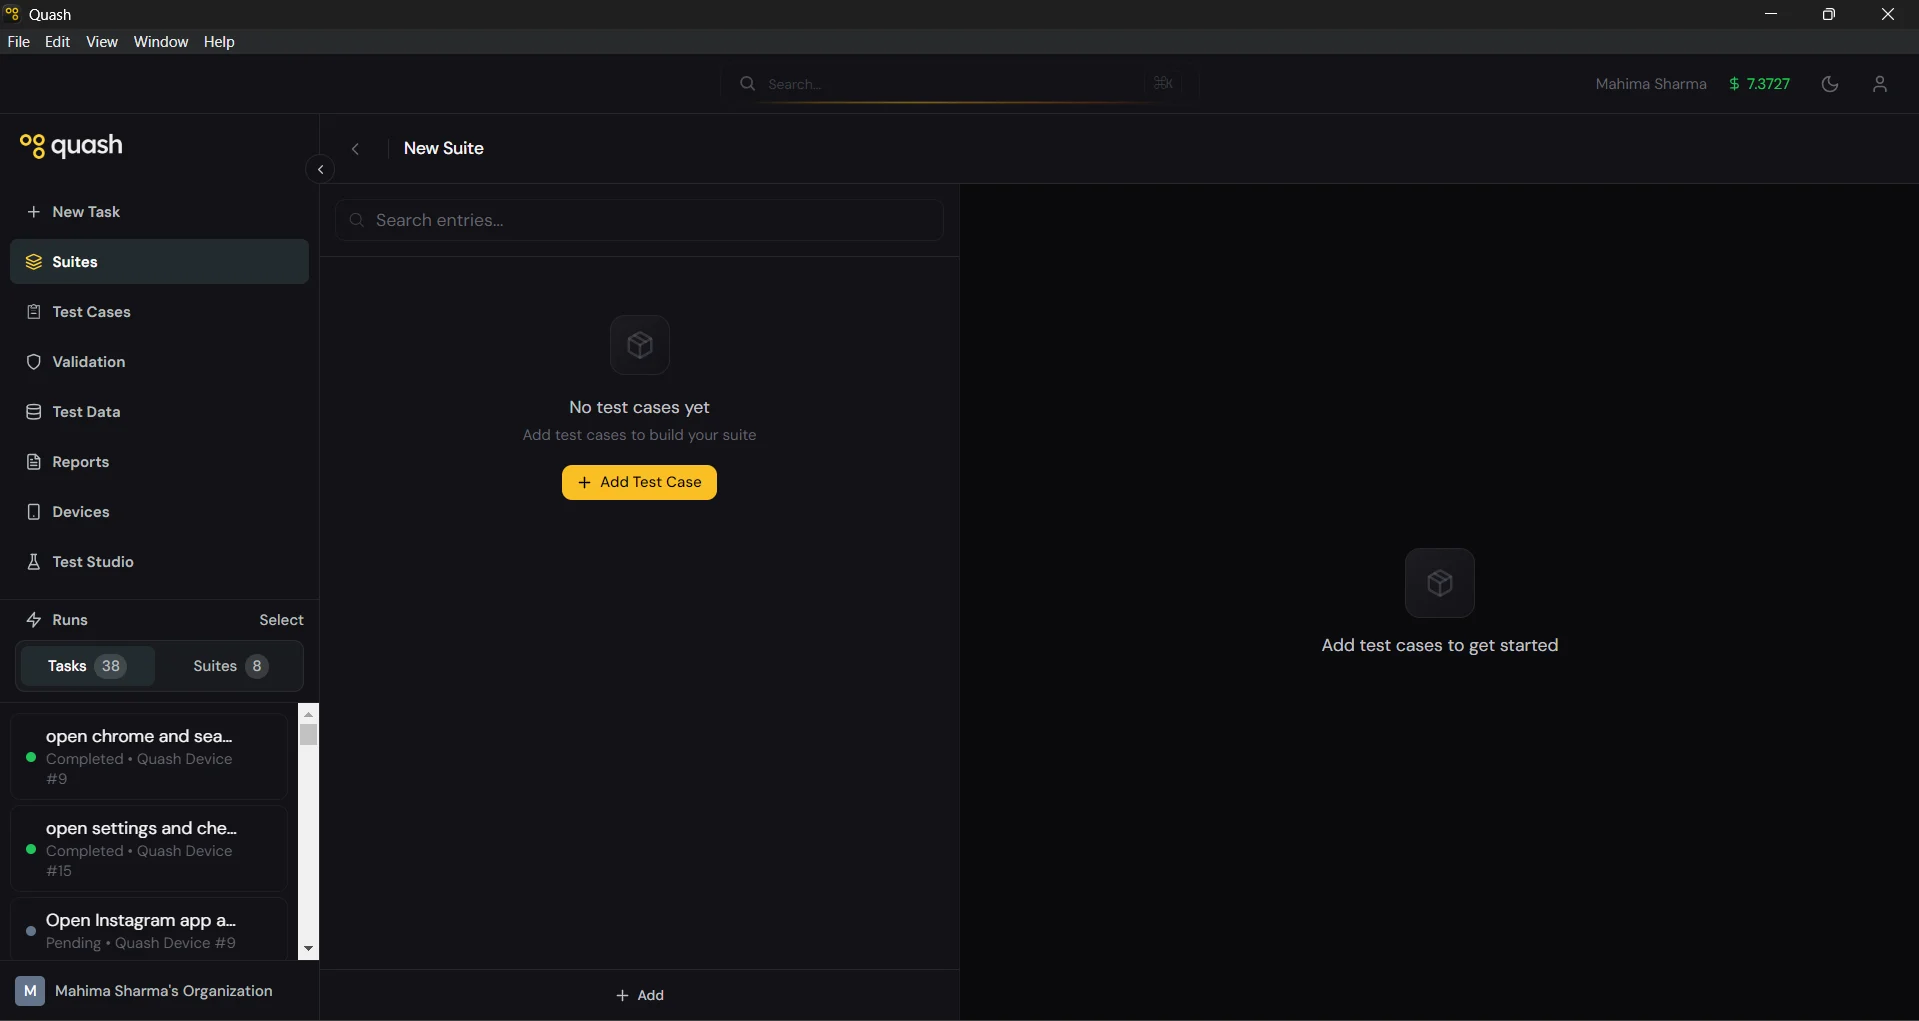
1. Click **Suites** in the left navigation panel.
2. Click **+ New Suite** in the top right.
1. Click the name field at the top of the new suite and give it a descriptive name.
Good suite names make the purpose obvious without opening it:
| Good | Poor |
| -------------------------------------- | ---------------------- |
| "Checkout Flow — Regression" | "Suite 3" |
| "Login & Auth — Smoke" | "Tests" |
| "Onboarding — Sprint 24 full coverage" | "Onboarding tests new" |
| "Payment — Edge Cases" | "Payment" |
## Step 2 — Add test cases
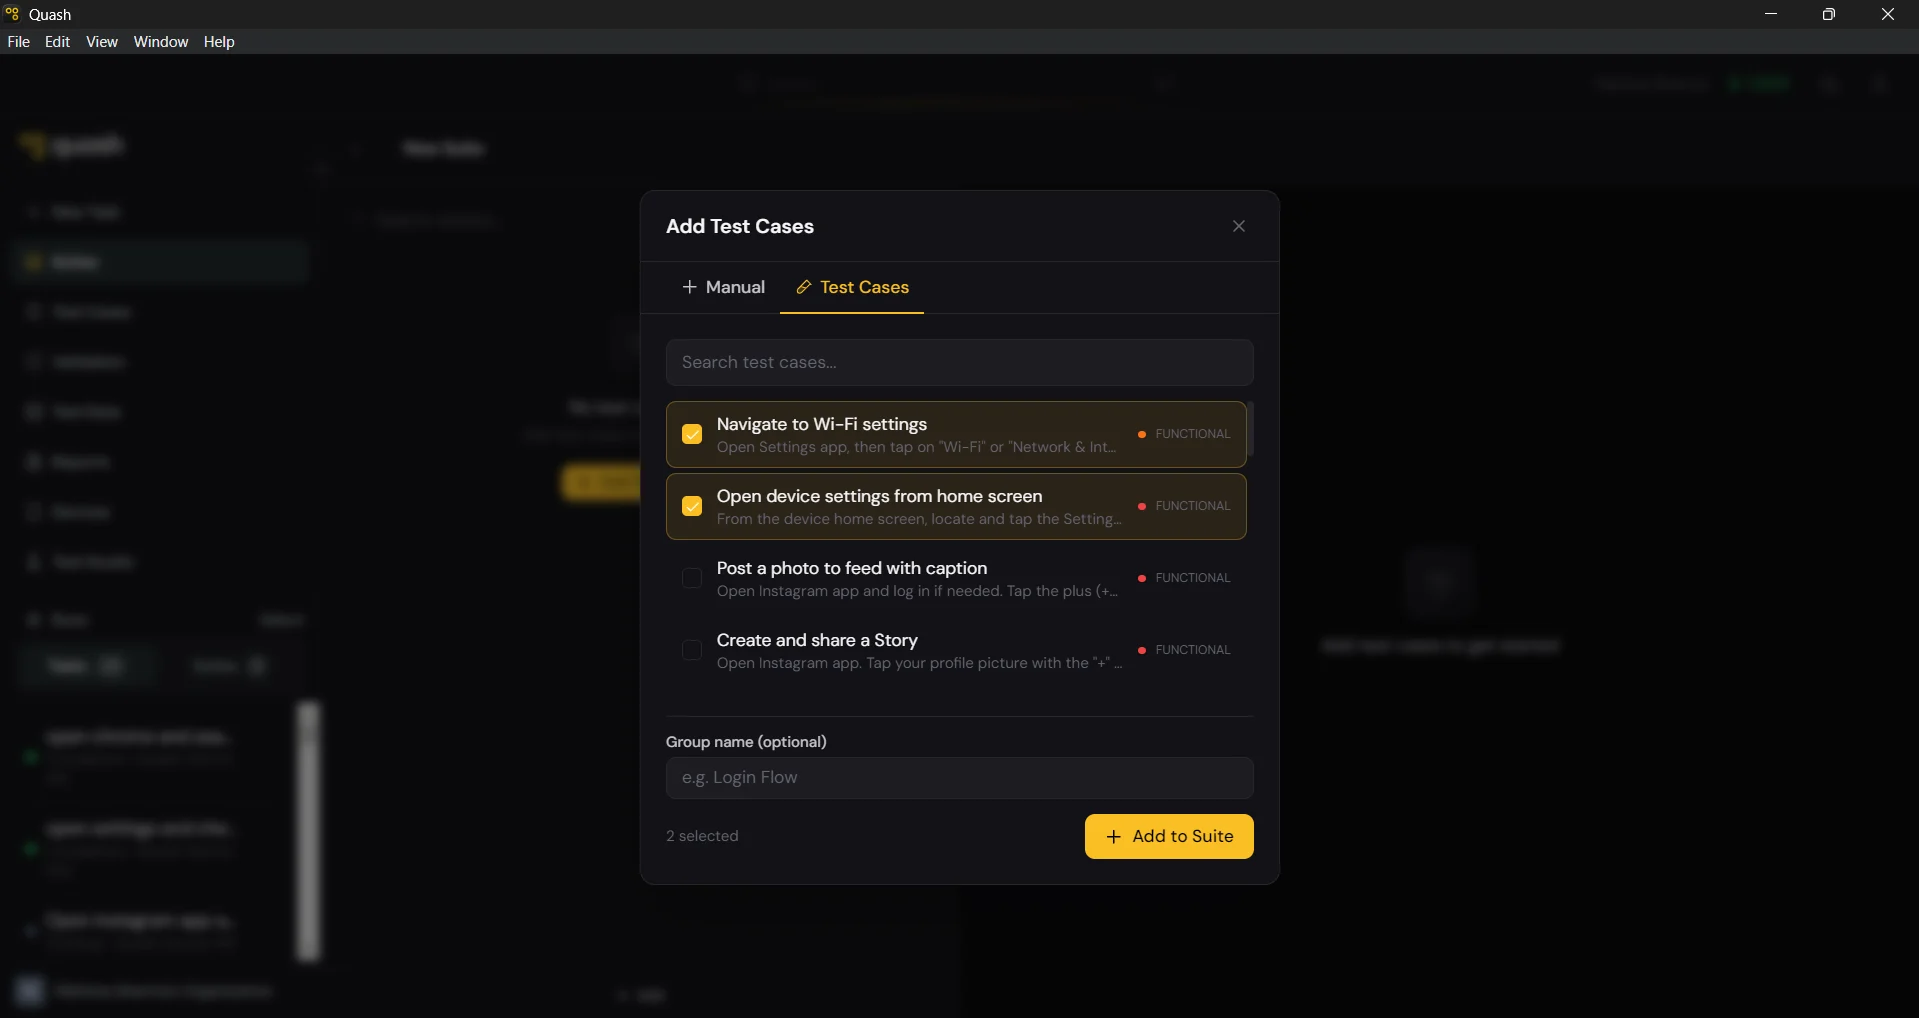
Click **Import Test Cases** in the center of the screen. The Add Test Cases modal opens with two tabs.
## From your library (recommended)
1. Click the **Test Cases** tab.
2. Search by name, or filter by priority, type, or tag.
3. Check the boxes next to the cases you want.
4. Click **+ Add to Suite**.
The selected cases are added immediately. Repeat the search and selection process as many times as needed — the modal stays open until you close it.
## Write a new one on the spot
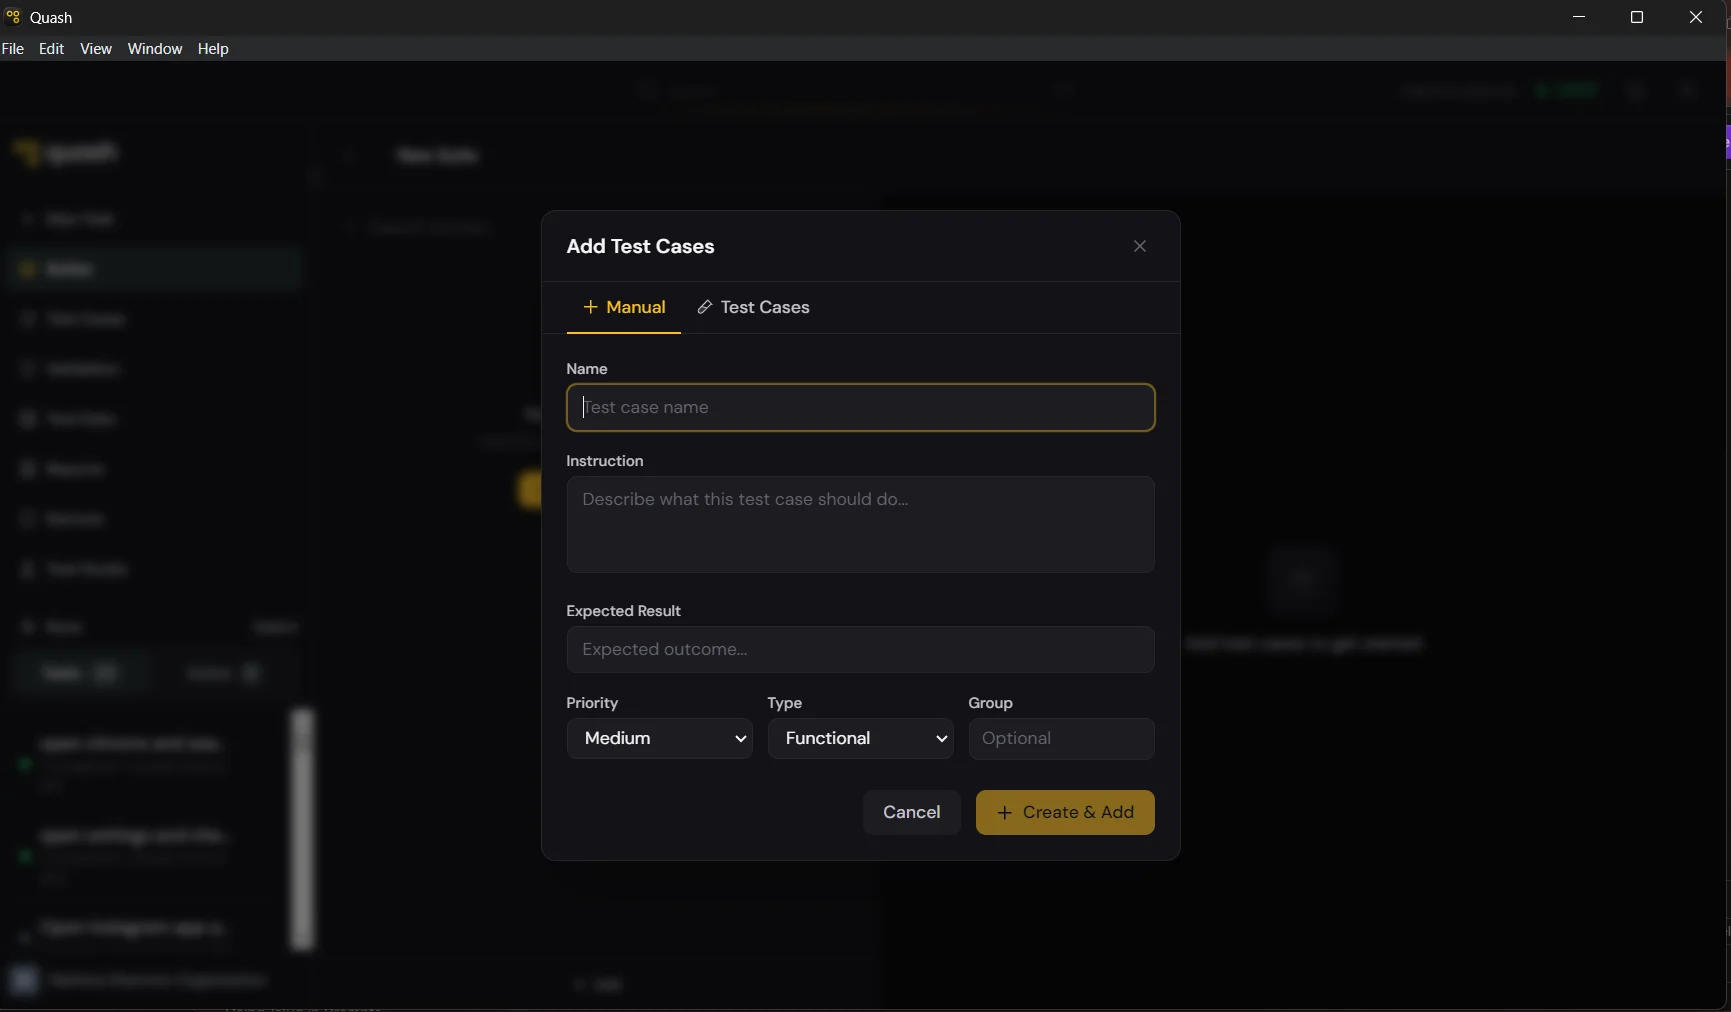
1. Click the **Manual** tab.
2. Fill in the name, instruction, expected result, priority, and type.
3. Click **+ Create & Add**.
The case is created, added to this suite, and saved to your[ Test Cases library](/test-management/test-case/about-the-test-cases-library) simultaneously — you do not need to create it separately first.
## Step 3 — Organise into groups (optional)
If your suite has more than six or seven cases, groups help with readability and navigation.
Click **+ Add Group** and give it a name. Drag test cases into the group, or assign them during the Add Test Cases flow.
Groups are visual only — they do not affect execution order or mode.
## Step 4 — Set execution mode
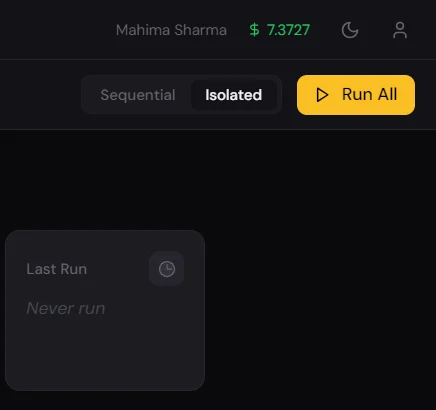
Use the **Sequential / Isolated** toggle in the top right of the suite view.
**Sequential** — cases run in order, sharing state. Use for connected flows. **Isolated** — cases run independently, can run in parallel. Use for self-contained tests.
If you are not sure, choose Isolated. You can switch at any time without affecting the test cases themselves.
[→ Full explanation: Sequential vs. Isolated](sequential-vs.-isolated)
## Step 5 — Run the suite
1. Click **Run All**.
2. Select the device or devices to run on from the device picker.
* For Isolated suites, you can select multiple devices — Quash distributes cases across them automatically.
* For Sequential suites, select one device — cases must run in order on the same device.
3. Click **Confirm**.
The run starts immediately. Go to **Reports** to watch results come in, or stay on the suite page — the pass rate updates in real time.
## Adding cases to an existing suite
You can add test cases to a suite at any time — not just at creation.
**From inside the suite:** Click **+ Test Case** at the bottom of the left panel. The same Add Test Cases modal opens. Search, select, and add.
**From the Test Cases library:** Select one or more test cases using the checkboxes in the library list. A bar appears at the bottom — click **Add to Suite** and choose this suite from the dropdown.
**From Test Studio:** After generating tests in a recipe, select them in the Tests panel and click **+ Add to Suite**. Choose this suite from the dropdown.
## Deleting a suite
Open the suite, click the **⋯** menu in the top right, and select **Delete Suite**. Confirm the deletion.
Deleting a suite does not delete the test cases inside it — they remain in the library. Only the suite grouping is removed.
 1. Click the name field at the top of the new suite and give it a descriptive name.
Good suite names make the purpose obvious without opening it:
| Good | Poor |
| -------------------------------------- | ---------------------- |
| "Checkout Flow — Regression" | "Suite 3" |
| "Login & Auth — Smoke" | "Tests" |
| "Onboarding — Sprint 24 full coverage" | "Onboarding tests new" |
| "Payment — Edge Cases" | "Payment" |
## Step 2 — Add test cases
Click **Import Test Cases** in the center of the screen. The Add Test Cases modal opens with two tabs.
## From your library (recommended)
1. Click the name field at the top of the new suite and give it a descriptive name.
Good suite names make the purpose obvious without opening it:
| Good | Poor |
| -------------------------------------- | ---------------------- |
| "Checkout Flow — Regression" | "Suite 3" |
| "Login & Auth — Smoke" | "Tests" |
| "Onboarding — Sprint 24 full coverage" | "Onboarding tests new" |
| "Payment — Edge Cases" | "Payment" |
## Step 2 — Add test cases
Click **Import Test Cases** in the center of the screen. The Add Test Cases modal opens with two tabs.
## From your library (recommended)
 1. Click the **Test Cases** tab.
2. Search by name, or filter by priority, type, or tag.
3. Check the boxes next to the cases you want.
4. Click **+ Add to Suite**.
The selected cases are added immediately. Repeat the search and selection process as many times as needed — the modal stays open until you close it.
## Write a new one on the spot
1. Click the **Test Cases** tab.
2. Search by name, or filter by priority, type, or tag.
3. Check the boxes next to the cases you want.
4. Click **+ Add to Suite**.
The selected cases are added immediately. Repeat the search and selection process as many times as needed — the modal stays open until you close it.
## Write a new one on the spot
 1. Click the **Manual** tab.
2. Fill in the name, instruction, expected result, priority, and type.
3. Click **+ Create & Add**.
The case is created, added to this suite, and saved to your[ Test Cases library](/test-management/test-case/about-the-test-cases-library) simultaneously — you do not need to create it separately first.
## Step 3 — Organise into groups (optional)
If your suite has more than six or seven cases, groups help with readability and navigation.
Click **+ Add Group** and give it a name. Drag test cases into the group, or assign them during the Add Test Cases flow.
Groups are visual only — they do not affect execution order or mode.
## Step 4 — Set execution mode
1. Click the **Manual** tab.
2. Fill in the name, instruction, expected result, priority, and type.
3. Click **+ Create & Add**.
The case is created, added to this suite, and saved to your[ Test Cases library](/test-management/test-case/about-the-test-cases-library) simultaneously — you do not need to create it separately first.
## Step 3 — Organise into groups (optional)
If your suite has more than six or seven cases, groups help with readability and navigation.
Click **+ Add Group** and give it a name. Drag test cases into the group, or assign them during the Add Test Cases flow.
Groups are visual only — they do not affect execution order or mode.
## Step 4 — Set execution mode
 Use the **Sequential / Isolated** toggle in the top right of the suite view.
**Sequential** — cases run in order, sharing state. Use for connected flows. **Isolated** — cases run independently, can run in parallel. Use for self-contained tests.
If you are not sure, choose Isolated. You can switch at any time without affecting the test cases themselves.
[→ Full explanation: Sequential vs. Isolated](sequential-vs.-isolated)
## Step 5 — Run the suite
1. Click **Run All**.
2. Select the device or devices to run on from the device picker.
* For Isolated suites, you can select multiple devices — Quash distributes cases across them automatically.
* For Sequential suites, select one device — cases must run in order on the same device.
3. Click **Confirm**.
The run starts immediately. Go to **Reports** to watch results come in, or stay on the suite page — the pass rate updates in real time.
## Adding cases to an existing suite
You can add test cases to a suite at any time — not just at creation.
**From inside the suite:** Click **+ Test Case** at the bottom of the left panel. The same Add Test Cases modal opens. Search, select, and add.
**From the Test Cases library:** Select one or more test cases using the checkboxes in the library list. A bar appears at the bottom — click **Add to Suite** and choose this suite from the dropdown.
**From Test Studio:** After generating tests in a recipe, select them in the Tests panel and click **+ Add to Suite**. Choose this suite from the dropdown.
## Deleting a suite
Open the suite, click the **⋯** menu in the top right, and select **Delete Suite**. Confirm the deletion.
Deleting a suite does not delete the test cases inside it — they remain in the library. Only the suite grouping is removed.
Use the **Sequential / Isolated** toggle in the top right of the suite view.
**Sequential** — cases run in order, sharing state. Use for connected flows. **Isolated** — cases run independently, can run in parallel. Use for self-contained tests.
If you are not sure, choose Isolated. You can switch at any time without affecting the test cases themselves.
[→ Full explanation: Sequential vs. Isolated](sequential-vs.-isolated)
## Step 5 — Run the suite
1. Click **Run All**.
2. Select the device or devices to run on from the device picker.
* For Isolated suites, you can select multiple devices — Quash distributes cases across them automatically.
* For Sequential suites, select one device — cases must run in order on the same device.
3. Click **Confirm**.
The run starts immediately. Go to **Reports** to watch results come in, or stay on the suite page — the pass rate updates in real time.
## Adding cases to an existing suite
You can add test cases to a suite at any time — not just at creation.
**From inside the suite:** Click **+ Test Case** at the bottom of the left panel. The same Add Test Cases modal opens. Search, select, and add.
**From the Test Cases library:** Select one or more test cases using the checkboxes in the library list. A bar appears at the bottom — click **Add to Suite** and choose this suite from the dropdown.
**From Test Studio:** After generating tests in a recipe, select them in the Tests panel and click **+ Add to Suite**. Choose this suite from the dropdown.
## Deleting a suite
Open the suite, click the **⋯** menu in the top right, and select **Delete Suite**. Confirm the deletion.
Deleting a suite does not delete the test cases inside it — they remain in the library. Only the suite grouping is removed.